Hướng dẫn form contact có đính kèm file, thêm nhiều trường khác
Bước 1: Tải file html và js.
Tải file js action form contact tại đây
Sau khi tải 2 file xong, chúng ta tạo biểu mẫu google.

Sau đó chúng ta tạo ra các field để điền dữ liệu

Tiếp theo chúng ta lấy biểu mẫu của google
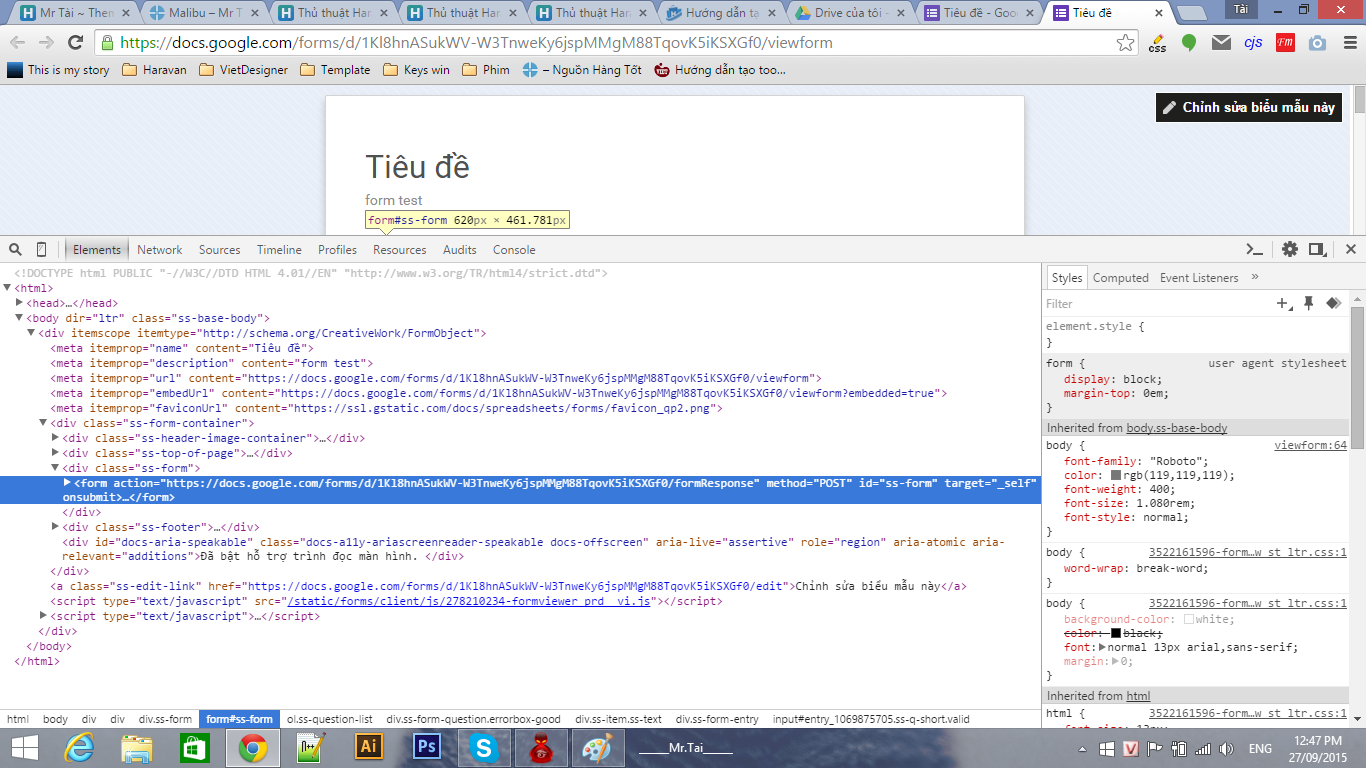
bấm F2 để edit html sau đó copy toàn bộ form vào trang contact
Sau khi copy form vào trang contact. Chúng ta copy url của form để add vào ajax
<form action="https://docs.google.com/forms/d/1Kl8hnASukWV-W3TnweKy6jspMMgM88TqovK5iKSXGf0/formResponse" method="POST" id="ss-form" target="_self" onsubmit="">
Chúng ta lấy url https://docs.google.com/forms/d/1Kl8hnASukWV-W3TnweKy6jspMMgM88TqovK5iKSXGf0/formResponse để thay vào code ajax
$.ajax({
$('#entry_1069875705').attr('value', $('#contactFormName').val());
$('#entry_622221238').attr('value', $('#contactFormPhone').val());
$('#entry_482189027').attr('value', $('#contactFormEmail').val());
$('#entry_235282476').attr('value', contactFormGioiTinh);
$('#entry_1304053588').attr('value', contactFormMucdich);
$('#entry_250350867').attr('value', $('#contactFormMessage').val());
các #entry_ chúng ta thay bằng id của google form lấy từ form action
Ở hai file này chèn vào trang contact hoặc bất cứ trang nào.
Tải file html action form contact tại đây
Tải file html action form contact tại đây
Tải file js action form contact tại đây
Sau khi tải 2 file xong, chúng ta tạo biểu mẫu google.

Sau đó chúng ta tạo ra các field để điền dữ liệu

Tiếp theo chúng ta lấy biểu mẫu của google

bấm F2 để edit html sau đó copy toàn bộ form vào trang contact
Sau khi copy form vào trang contact. Chúng ta copy url của form để add vào ajax
<form action="https://docs.google.com/forms/d/1Kl8hnASukWV-W3TnweKy6jspMMgM88TqovK5iKSXGf0/formResponse" method="POST" id="ss-form" target="_self" onsubmit="">
Chúng ta lấy url https://docs.google.com/forms/d/1Kl8hnASukWV-W3TnweKy6jspMMgM88TqovK5iKSXGf0/formResponse để thay vào code ajax
$.ajax({
type: 'POST',
url: 'https://docs.google.com/forms/d/1Kl8hnASukWV-W3TnweKy6jspMMgM88TqovK5iKSXGf0/formResponse',
data: jQuery('#ss-form').serialize(),
dataType: 'json',
async: false,
success: function(data) {
},
error: function(xhr, textStatus, errorThrown) {
}
});
url: 'https://docs.google.com/forms/d/1Kl8hnASukWV-W3TnweKy6jspMMgM88TqovK5iKSXGf0/formResponse',
data: jQuery('#ss-form').serialize(),
dataType: 'json',
async: false,
success: function(data) {
},
error: function(xhr, textStatus, errorThrown) {
}
});
$('#entry_1069875705').attr('value', $('#contactFormName').val());
$('#entry_622221238').attr('value', $('#contactFormPhone').val());
$('#entry_482189027').attr('value', $('#contactFormEmail').val());
$('#entry_235282476').attr('value', contactFormGioiTinh);
$('#entry_1304053588').attr('value', contactFormMucdich);
$('#entry_250350867').attr('value', $('#contactFormMessage').val());
các #entry_ chúng ta thay bằng id của google form lấy từ form action